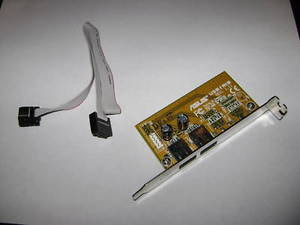
How to use Asus USB/MIR adaptor to other motherboard
One of my client recently try to use the ASUS USB/MIR REV. 1.11 (the 2 usb port type) adaptor which he got from his old ASUS motherboard to his new computer. His problem is any USB storage device he try to insert in ASUS USB/MIR port a "USB Device Not Recognized" pop-up appear.
The problem is, Asus have fitted filtering on the two data lines to each USB port in the form of a series resistor (10 ohms on one line and 4.7 ohms on the other) and a shunt capacitor to ground at the USB socket end which cause the problem.
The only solution is to remove this filtering by removing the four SMD capacitor (C2, C3, C4, C5). Do not remove C1, C6 and the electrolytics CE1 and CE2. I use hot air rework station to remove those SMD capacitors. After the removal the Asus USB/MIR device recognized any USB flash drive that I inserted.
The only solution is to remove this filtering by removing the four SMD capacitor (C2, C3, C4, C5). Do not remove C1, C6 and the electrolytics CE1 and CE2. I use hot air rework station to remove those SMD capacitors. After the removal the Asus USB/MIR device recognized any USB flash drive that I inserted.


11 comments:
Excellent! Thanks for the tip. I've just been able to use my old Asus USB/MIR adaptor; I'd been expecting to have to bin it.
By the way, should anyone else who reads this be doubting their ability to de-solder these tiny components, a Stanley knife did the job perfectly for me.
This "how to" is fantastic.
Despite that, for me, the information that only storage devices doesn't word with these ports was enough.
My adaptor is brand new, so I prefer to use it for another purpose (e.g to connect my USB mouse and keyboard) instead of removing its components.
Fantastic, your page and pictures were very helpful! I took the sloppy, brutish route and carefully pried C2-C5 off with a small jeweler screwdriver. I ran CrystalMark against my USB drive and it was actually a tiny bit faster on the Asus adapter vs the on-board adapter! Thanks! jxf011
I salvaged this exact part from an old computer, and you were completely right. Before altering the part everything BUT thumbdrives worked. Simply removing those four capacitors did the trick. I used a small pair of needle-nose pliers and just ripped them off. And to think I had been looking for a driver before...
Thanks for the walk-through!
Excellent, fantastic, awesome! Megatips forever! Txs, txs and txs!
Thanks for you !!!
I searched for a solution I did not find
I will experiment
Wow! Great, thanks! ;)
Great tip. Thanks. Works perfect! -b
thanks you for share your solution
it's works fine ...
Alex from Brazil
Thanx!!!! It save me a lot of trouble and ité work fine.
Thank you! it works indeed!
Post a Comment